Showing posts with label Madd Model Jalackie. Show all posts

Thursday, April 25, 2013

Psychic Pots!!!

I figured it was time I get back into makeup. I know these posts have been pretty sparse lately. I have been running the idea of a beginner friendly, quick and easy neutral look over in my brain for a while now, and what better time to bring it to you than today?!?

First, you're going to gather your tools and products.
\

Brushes! I know this looks like a lot of brushes, but I promise - each one has a purpose. Don't be intimidated.


Products: Top to bottom: NYX eyeshadow base in white; Brazen brow powder in Clara; MSC Psychic Paper, Dirty Chai, Fresh Pots!, and Snuffy; UD 24/7 liner in Rockstar; IT Cosmetics Hello Lashes! mascara, MSC shadow primer, "Optimus Primer.


Start out with a clean face. If you're not fresh out of the shower, do a quick wash, or a once-over with  a cosmetic or baby wipe. Be sure to gently clean your eyelids, as they can get grimy and oily, too.


Once your face is clean, apply your Optimus Primer. Do that from lid to browbone. They apply a *very light* amount of shadow base. You want just the barest trace of it, as shown above. Shadow bases can be applied with fingers or a brush; I use my finger.


Next, using your UD 24/7 liner in Rockstar, line your lower waterline and lash line. Now, if you're like me, your waterline never lines quite evenly. That's alright. Do the best you can. You'll be going over the liner later anyway. Rockstar is kind of a purpley-brown; don't worry about that. It works, I promise.


Grab your Bdellium 777 brush and Dirty Chai. If you don't have Bdellium brushes, use a small to mid-sized soft shadow brush.


Apply Dirty Chai using fluid strokes to your entire lid.


With your Bdellium 781 (can be subbed with a medium, semi-stiff crease brush,) pick up some Snuffy. 


Use your brush to "draw in" a cut crease and the outer 1/3rd of your lid. It's going to look like a hot mess right now. Don't worry. You'll fix it in the next step.


Now grab a short, dense, fluffy round brush. This is a Sonia Kashuk for Target brush. Best $6 I've ever spent.


Using your fluffy brush, blend Snuffy down and in to your Dirty Chai. Snuffy goes on very coppery, but has an almost pressure-sensitive quality to it in that it rubs down to a darker, more mellow warm brown.


With your Bdellium 716 (can be subbed with a medium-stiff well pointed pencil brush,) pick up some Fresh Pots!


Using that crisp point, line your upper lash line with Fresh Pots!


Once you've lined your upper lash line, use the same brush to set your 24/7 liner on your lower lash line and water line. To do that, just lightly pack the shadow on top of the liner.


Now, using a mid-sized medium stiff shadow brush (This one is by ELF Studio,) pick up some Psychic Paper. Psychic Paper is a matte, while the rest of your pigments thus far have been either satin or glitter. That's alright. It meshes well because MSC mattes go on and blend like buttah.


Swipe Psychic Paper from your duct, up your arch and to your brow, being careful not to overlap too much onto Snuffy.


A closer shot of Psychic Paper. It's a very subtle highlight color, but oh-so-pretty!


Using the brush you used to apply Psychic Paper, blend ever so slightly down into Snuffy and Dirty Chai. You just want to eliminate the line of demarcation, you don't want to further dilute your colors.


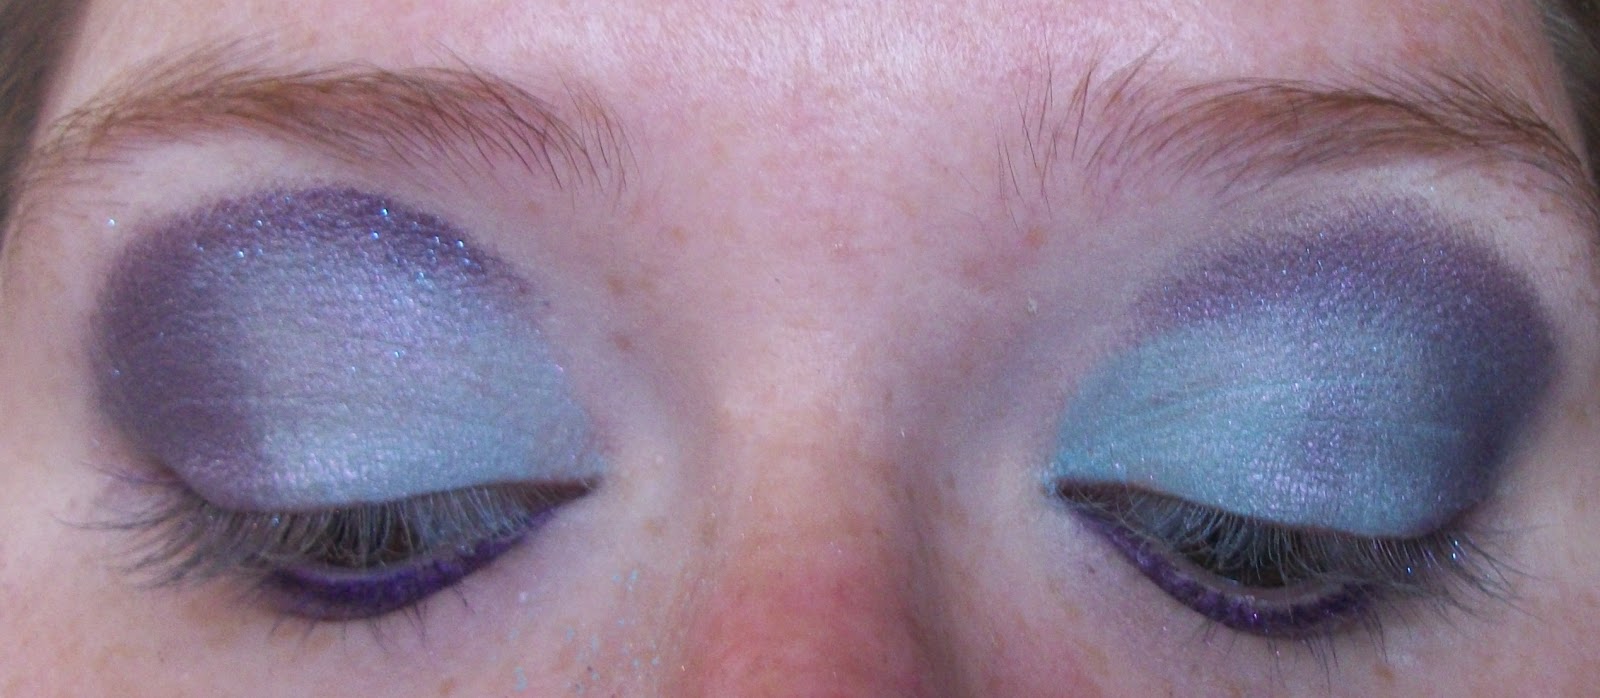
Fill in your brows and add some mascara!


Bam! An easy, somewhat smokey day neutral in just a couple of short steps. This look is perfect for the gal (or the mom) who is on the run and pressed for time and patience. 


As always, stay Madd, darlings!!!

Monday, February 11, 2013

Lucky Brew

Hello again, Madd Cats! What on EARTH is this, three posts in three weeks? You'd almost think I'm back on my game or something.

Today's tutorial features not only the "Luck Potion" from the "Love Potions" collection over at Madd Style, but it also features my new Bdellium green bamboo smokey eye brushes!


Products used: IT Cosmetics Hello Lashes mascara, UD 24/7 in Perversion, NYX shadow base in white, MSC Optimus Primer, Witch's Brew, Steampunk, Acid Bath, and Luck Potion.


Bdellium green bamboo smokey eye brushes, numbers 777, 769, and 781


Prime, prep, and line your eye.


Pick up some Acid Bath on your 781 brush.


Apply to duct.


With your 769 angled contour brush, pick up some Witch's Brew. I love this colors, it's so many colors in one. Forest green, golden yellow, deep gray... it's MAGIC.


Apply to inner 2/3rd's of the lid.


Back to the 781 with your Steampunk.


Hit up that outer 1/3rd and cut your crease with the Steampunk.


Now, with your 777 brush, pick up some Luck Potion.


Dust that over your brow, and gently blend down into the rest of the eye.

Here you can see how it has an almost teal shift to it.


Lime green sparkles on the inner brow.


The entire look together.  Perfect night look when you want something that will really stand out in the crowd.

Stay Madd, Darlings!

Thursday, February 7, 2013

Curious Soul

I've been trying desperately to get out of my makeupless funk lately, so I decided to ask some of the fabulous Madd Style fans for color suggestions for my latest tutorial.  Soul Dust was number one on the list.

Here I'll pair it with Curiouser and Curiouser from the Alice in Wonderland collection, as well as Giggleberry.


Assemble your brushes. Top to bottom: fluffy shadow brush, tapered crease brush, angled shadow brush, fluffy blending brush.


Assemble your products! Top to bottom: IT Cosmetics "Hello Lashes" mascara, UD Psychadelic Sister liner, UD Perversion liner, MSC Optimus Primer, Curiouser & Curiouser, Soul Dust, Giggle Berry, and NYX shadow base in white.


Apply your primer and base to a nice clean eye.  Remember, if it's been a bit since you've washed your face, a wet wipe is a good way to just touch up and remove the oil that may have accumulated since your shower in the morning.


Tight line your lower lashline with Psychadelic Sister.


Grab your Soul Dust. This is such an awesome color. As you can tell, it's a lovely blue with a red color shift and red sparkle. It's hard to capture on camera, but trust me, it's amazeballs.


Apply with your fluffy shadow brush by patting it on to the inner 3/4th of your lid. You can kind of see the red shift of the Soul Dust in this photo.


Grab that tapered crease brush! Grab that Curiouser & Curiouser! Curiouser & Curiouser is a lovely plummy purple with aqua sparkles. Also, I love this brush, it's so incredibly versatile and it's synthetic, too!


Pat C&C on the outer corner of your eye, and cut that crease with it. If you enlarge this photo, you can see the aqua sparks.


Use your fluffy blender to gently, gently blend C&C into Soul Dust.


With your tapered shadow brush, you want to apply Giggle Berry with a gentle sweeping motion from your tear duct to your brow as a highlight. Don't blend it down into C&C much at all.


You'll notice that after blending, the aqua in C&C really plays off the Soul Dust, and the pink in Giggle Berry brings out the red. 

You're also going to put a little bit of Perversion over the Psychadelic Sister at this point, just to tone it down a bit. 


Add your mascara...


Glance over at the dog...


And Voila! An awesome multi-dimensional look with some kick ass colors!

Friday, February 1, 2013

Dark Cupid - red and black look

So, the request was recently made for a red and black look. I agonized over what direction I wanted to take this in.. go superdark and goth, make it smokey, more red than black... Finally, I decided on a smoky black with red.


This WILL be a glasses tutorial.


Assemble your products. IT cosmetics mascara, NYX Shadow base in white (Quick note here - you reall need a black base for this look, but I don't have one and desperately need base, so this had to do.)UD 24/7 in Perversion, and MSC Optimus Primer, Ruby, Winter Rose, and Stormhold Ruby.


Glasses! Brushes! Top to bottom: fluffy shadow brush, medium angled shadow brush, sharply tapered pencil brush, medium contouring brush, large contouring brush, fluffy medium shadow brush.


Put on your primer and base.  I used just a touch of base, because I really didn't want the colors of this to be changed, I just needed that little extra "stick" for these colors


Line your waterline with UD 24/7.


Pick up some Winter Rose with your medium contour brush.


Pat liberally into your duct area.


Time for some Ruby. Pick up a good amount on the angle of the brush.


Apply to 2/3's of your lid, extending above your natural crease.


With your stiff, tapered pencil brush, pick up a good amount of Stormhold Ruby.


Keep your medium shadow brush on hand.


Do the same with your large contour brush.


DRAW IN your Stormhold Ruby.  Don't worry, it's a hot mess at first.


Use your shadow brush to gently bring in the sStormhold Ruby and distribute it on to the outer 1/3rd of your lids and into the crease.

You want your end result to look like so.


Add your glasses, and you're ready for a sexy valentine's night out!