Showing posts with label Purples. Show all posts

Thursday, February 7, 2013

Curious Soul

I've been trying desperately to get out of my makeupless funk lately, so I decided to ask some of the fabulous Madd Style fans for color suggestions for my latest tutorial.  Soul Dust was number one on the list.

Here I'll pair it with Curiouser and Curiouser from the Alice in Wonderland collection, as well as Giggleberry.


Assemble your brushes. Top to bottom: fluffy shadow brush, tapered crease brush, angled shadow brush, fluffy blending brush.


Assemble your products! Top to bottom: IT Cosmetics "Hello Lashes" mascara, UD Psychadelic Sister liner, UD Perversion liner, MSC Optimus Primer, Curiouser & Curiouser, Soul Dust, Giggle Berry, and NYX shadow base in white.


Apply your primer and base to a nice clean eye.  Remember, if it's been a bit since you've washed your face, a wet wipe is a good way to just touch up and remove the oil that may have accumulated since your shower in the morning.


Tight line your lower lashline with Psychadelic Sister.


Grab your Soul Dust. This is such an awesome color. As you can tell, it's a lovely blue with a red color shift and red sparkle. It's hard to capture on camera, but trust me, it's amazeballs.


Apply with your fluffy shadow brush by patting it on to the inner 3/4th of your lid. You can kind of see the red shift of the Soul Dust in this photo.


Grab that tapered crease brush! Grab that Curiouser & Curiouser! Curiouser & Curiouser is a lovely plummy purple with aqua sparkles. Also, I love this brush, it's so incredibly versatile and it's synthetic, too!


Pat C&C on the outer corner of your eye, and cut that crease with it. If you enlarge this photo, you can see the aqua sparks.


Use your fluffy blender to gently, gently blend C&C into Soul Dust.


With your tapered shadow brush, you want to apply Giggle Berry with a gentle sweeping motion from your tear duct to your brow as a highlight. Don't blend it down into C&C much at all.


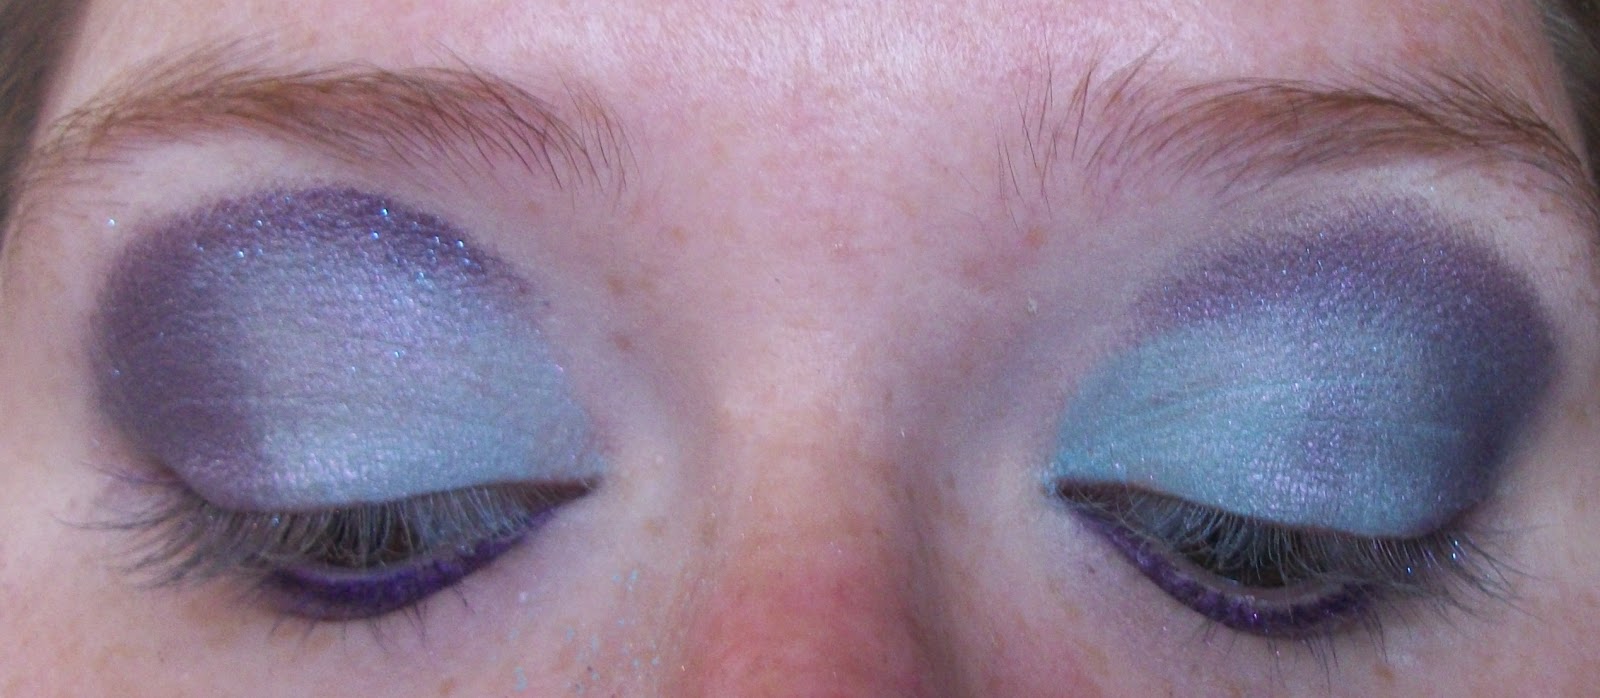
You'll notice that after blending, the aqua in C&C really plays off the Soul Dust, and the pink in Giggle Berry brings out the red. 

You're also going to put a little bit of Perversion over the Psychadelic Sister at this point, just to tone it down a bit. 


Add your mascara...


Glance over at the dog...


And Voila! An awesome multi-dimensional look with some kick ass colors!

Friday, August 3, 2012

Inspired by Treasure Planet

I LOVE the movie "Treasure Planet."  It's one of the most underrated Disney movies around.

It comes as no surprise, then, that I decided to do a look inspired by it whilst my daughter had it on TV.

Here's the still that served as my muse:

Are those colors not stunning? Absolutely lovely.

Now.  You know the drill.  Gather your products and equipment!


L to R: VERY large fluffy shadow brush, crease brush, medium fluffy shadow brush, medium dense shadow brush, medium pencil brush, concealer/shadow base brush.

WnW MegaPlump mascara, Sephora sparkly black liner, NYX shadow base in white, MSC Awesome Sauce, Optimus Primer, and Greased Lightening, Kablammy, Unbirthday Star, Bang Bang, Pool of Tears, Disco Biscuit, and T-Birds.


Ignore my ungroomed eyebrow.  Apply in this order: Optimus Primer, NYX Shadow base, and just the teensiest smudge of Awesome Sauce.  Allow the Awesome Sauce to dry until tacky, and then re-blend with the shadow base (using a clean finger) if needed.


Line your lower lash line.


Apply Greased Lightening to your duct with the medium fluffy brush.  Then, inner to outer, apply T-Birds, Pool of Tears, and Disco Biscuit using the firm shadow brush.  Don't worry about the fallout yet, or how even you get it.


Blend GENTLY with the XL fluffy brush.


Time to cut your crease, but double it!  Cut first with Kablammy using the crease brush, and then on top of that with Bang Bang using the pencil brush.


Apply Unbirthday Star above your crease using the firm shadow brush.  Blend down from Unbirthday Star to your blues using the XL fluffy brush.


Clean up your fallout, apply mascara.


Ta Daaa!!!!! A gorgeous, bold look inspired by one of the best Disney movies around.

Stay Madd, darlings!

Saturday, July 28, 2012

Pink Pixies

Assemble your tools! MSC Pink Ladies, Pixie, Greased Lightening, and Beauty School Dropout.  UDPP, NYX Shadow base in white, WnW mascara, generic mahogany brown liner, Sephora Lash Primer.

Nakey eye!

 Eye with UDPP and NYX

 Line your lower lash line with the mahogany brown.

 Using an angled shadow brush, pick up some Pink Ladies.

 Apply to inner half of lid.

 Pick up some Pixie with an XL pencil brush.

 Fill in crease and outer half of lid.  Blend gently with finger.

 Using a fluffy shadow brush, pick up some Beauty School Dropout.

 Apply lightly with a very, very gentle sweeping motion over entire eye, including over Pixie and Pink Ladies.

 With a stiff liner brush, pick up some Greased Lightening.

 Set the mahogany liner with Greased Lightening, and line the upper outer half of your eye with it, as well.

 Upper lid - zoom in and check out the pearly glitteryness that Beauty School Dropout creates.

Lower lash line

 Add some lash primer...
And some mascara...

Et Voila!  Stay Madd, darlings!

Sunday, January 8, 2012

Full Frontal Makeuping

Hello lovelies.  I have a lot of things swirling in my brain to talk about, but it's simply not the right time to do so.  It would add fuel to an already out of control fire.  So, instead I bring you makeup.


Peekaboo!

Korred Quercetin and Oak primer, Crushed Botanicals liquid mineral foundation, and MSC Effin' Perfektion Powder.   This is my first time using Crushed Botanicals liquid mineral foundation.  I think I'm in love, ya'll.  It has all the buildable and blendability as a mineral makeup foundation powder with none of the danger of over-powdering.  I rate this product an A-FREAKING-PLUS.  I personally mix the Fair and Light since my skin has both yellow and red tones to it, and it matches my neck and chest perfectly.  Like, literally disappears.
As much as I am a proponent for using brushes on one's eyes and lips, I have not quite mastered them for foundation, so I just use my tips or a beauty sponge to blend.  You can tell here that I have some very definite red splotches on my cheek bones and a bit of yellowing under my eyes

Ta Daa!!! You can see how awesomely it covered the red spots and neutralized the yellow?  This was with some Effin Perfektion Powder to set it.  I have Kelli's mineral makeup setting spray (Along with a host of her other products that will be reviewed soon!) but have not had a chance to use it yet, as this tutorial was was an impromptu middle-of-the-night thing.  Please also forget the lack of blush - my favorite finally ran out and I'm heartbroken over it, so haven't looked around for another one I love quite as much.

Now, on to le eyeballs!

Products! NYX shadow base in white, Benefit Stay don't Stray eye primer, liner marker in black, kohl black liner, MUFE Smoky Lash in Black, NYX eye/brow pencil in Taupe, and MSC Kiss with a Fist, Pixie, Ohm and Sugar Plum. Not pictured because it rolled under the bed: MSC Jive Talk.

Tools!


Make sure your eyeball is naked.  Well, naked except for your primer and a touch of shadow base.  Then lightly tight-line with the black kohl pencil.

Put Jive Talk in the inner corners and ducts of your eyes.  Pat, don't sweep.


Then pat Pixie on to the middle halves of your lids, taking care to saturate the lash line.  Pixie is such a decadent color - true soft purple with more gold glitz than I can begin to explain.  If you don't have it yet, you definitely need it!

 On your outer halves of your lids, pat on Sugar Plum.  It's another super decadent, rich color.  It makes me want to roll in it akin to a CEO rolling in the money they'd have if they cashed their checks.


Blendy blendy! VERY light windshield motions from full inner to full outer.


Highlight with Kiss with a Fist, blending it down into the other colors on your lid and in your crease.

Line your eyes with the pen, and then use Ohm to set it all.


Better shot of the lower lash line set with Ohm.  The gold in the Ohm really brings out the gold glitz in Pixie and gives you just enough sparkle.

One more of the top.  I just love the way this blended out.


Definitely an evening look, and definitely accentuated and made all the more lovely with glasses!

Stay Madd, darlings!