Showing posts with label Mineral Pigments. Show all posts

Thursday, February 7, 2013

Curious Soul

I've been trying desperately to get out of my makeupless funk lately, so I decided to ask some of the fabulous Madd Style fans for color suggestions for my latest tutorial.  Soul Dust was number one on the list.

Here I'll pair it with Curiouser and Curiouser from the Alice in Wonderland collection, as well as Giggleberry.


Assemble your brushes. Top to bottom: fluffy shadow brush, tapered crease brush, angled shadow brush, fluffy blending brush.


Assemble your products! Top to bottom: IT Cosmetics "Hello Lashes" mascara, UD Psychadelic Sister liner, UD Perversion liner, MSC Optimus Primer, Curiouser & Curiouser, Soul Dust, Giggle Berry, and NYX shadow base in white.


Apply your primer and base to a nice clean eye.  Remember, if it's been a bit since you've washed your face, a wet wipe is a good way to just touch up and remove the oil that may have accumulated since your shower in the morning.


Tight line your lower lashline with Psychadelic Sister.


Grab your Soul Dust. This is such an awesome color. As you can tell, it's a lovely blue with a red color shift and red sparkle. It's hard to capture on camera, but trust me, it's amazeballs.


Apply with your fluffy shadow brush by patting it on to the inner 3/4th of your lid. You can kind of see the red shift of the Soul Dust in this photo.


Grab that tapered crease brush! Grab that Curiouser & Curiouser! Curiouser & Curiouser is a lovely plummy purple with aqua sparkles. Also, I love this brush, it's so incredibly versatile and it's synthetic, too!
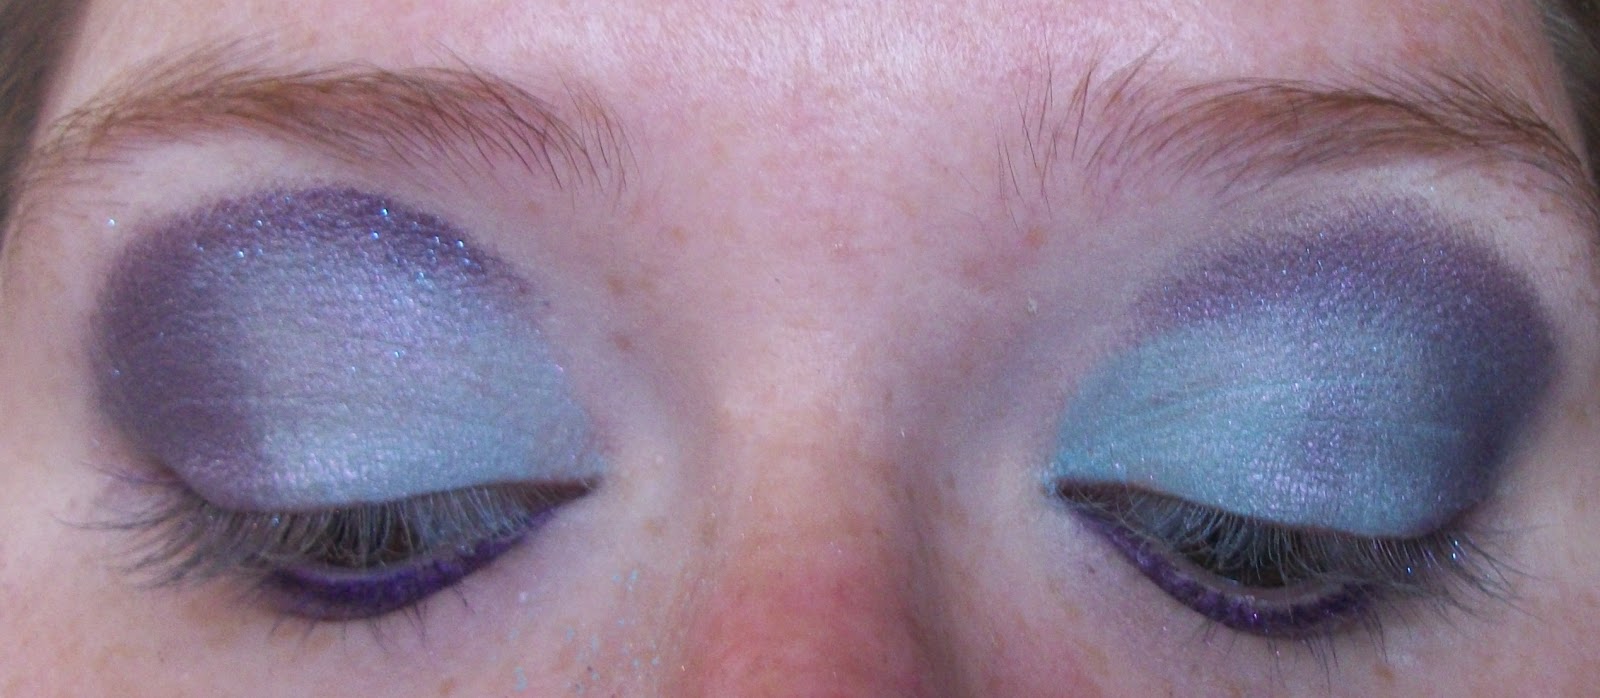

Pat C&C on the outer corner of your eye, and cut that crease with it. If you enlarge this photo, you can see the aqua sparks.


Use your fluffy blender to gently, gently blend C&C into Soul Dust.


With your tapered shadow brush, you want to apply Giggle Berry with a gentle sweeping motion from your tear duct to your brow as a highlight. Don't blend it down into C&C much at all.


You'll notice that after blending, the aqua in C&C really plays off the Soul Dust, and the pink in Giggle Berry brings out the red. 

You're also going to put a little bit of Perversion over the Psychadelic Sister at this point, just to tone it down a bit. 


Add your mascara...


Glance over at the dog...


And Voila! An awesome multi-dimensional look with some kick ass colors!

Sunday, September 4, 2011

When life hands you lemons...

...You paint that shit gold.  With eye makeup.

Feeling in a bit of a slump, I decided to re-create in pictorial form an eye look that I did yesterday for a possible interview.  Didn't get the interview, but definitely went out looking FIERCE.


The original look in natural light.

Us girls with glasses have a unique challenge when it comes to eye makeup.  We have to go a bit bolder than most, but the worry about being TOO bold or downright tacky, is very real.

Below you'll find a look that works well for both day/business and night/casual.

First, let's look at our supplies:
Left to Right, top row: Unknown brow pencil, Hazel; Maybelline waterproof liner, Black; Estee Lauder Projectionist mascara, black; UDPP, Original; NYX eyeshadow base, Pearl; Madd Style Cosmetix eye pigments in Bubblegum Crisis, Phantasm, Revenge, and Bitch Slap.

Brushes below are a collection of Ecotools, Sonia Kashuk, and Essence of Beauty.

Now, on to the steps!

Step 1: Clean, naked face.  I prefer to do my eyes first and then apply the rest of my makeup.  Switch it up as needed.

Step 2: Primer.  Smoosh it alll around the eye, up to the brow, and the lower lash line.


Step 3: Shadow base.  I apply it with a brush, and then blend gently with clean (CLEAN!) fingers so that the end product is very soft.


Step 4: Gently pat Bubblegum Crisis along the inner half of your lid.  Draw an imaginary line bisecting your pupil; stop at the line.

Step 5: Take a blurry toddler break.


Step 6: Pat the outer half of your eyelid with Phantasm.  Don't worry yet about fallout.


Step 7: Blend, dahling!  Blend!  You don't want a definite line of demarcation, you want everything to flow together naturally.  Blend and blend some more.  I use the stubby floofy Ecotools brush above. 

Step 8: Line, dahling! Line! My eyes have gone through hell and back lately, so with them being as sensitive and sore as they are, they don't much like me lining.  Do a better job than I did.

Step 9: Using your pencil brush, apply Bitch Slap to your ducts and over your liner to set it.  Blend outward as you go along the liner, so that there is a gradual fade into the plain black.


Step 10: Using a nice, soft, floofy brush (like my white Sonia Kashuk above,) pat on some Revenge along the upper side of your crease to the top of your ocular cavity or your brows, whichever you prefer.  They're both the same for me. =P  Once you have it on there, go back to your larger floofy brush, and blend bitchslap up into Revenge, and Revenge down into Bubblegum Crisis and Phantasm.  Remember, NO HARSH LINES!!! If you can still see lines, blend more, using a back and forth motion for across your lid and up and down motion for highlight to lid/duct to highlight.  Don't touch the bottom lash line.


 Step 11: Apply Mascara.  No, those are not faux lashes.  Yes, they're really mine.


 Step 12: Wipe off the fall out (I use baby wipes,) put on the rest of your face and something other than a ratty grandma robe like I'm wearing above, and go rock the look!