Showing posts with label Blues. Show all posts

Thursday, February 7, 2013

Curious Soul

I've been trying desperately to get out of my makeupless funk lately, so I decided to ask some of the fabulous Madd Style fans for color suggestions for my latest tutorial.  Soul Dust was number one on the list.

Here I'll pair it with Curiouser and Curiouser from the Alice in Wonderland collection, as well as Giggleberry.


Assemble your brushes. Top to bottom: fluffy shadow brush, tapered crease brush, angled shadow brush, fluffy blending brush.


Assemble your products! Top to bottom: IT Cosmetics "Hello Lashes" mascara, UD Psychadelic Sister liner, UD Perversion liner, MSC Optimus Primer, Curiouser & Curiouser, Soul Dust, Giggle Berry, and NYX shadow base in white.


Apply your primer and base to a nice clean eye.  Remember, if it's been a bit since you've washed your face, a wet wipe is a good way to just touch up and remove the oil that may have accumulated since your shower in the morning.


Tight line your lower lashline with Psychadelic Sister.


Grab your Soul Dust. This is such an awesome color. As you can tell, it's a lovely blue with a red color shift and red sparkle. It's hard to capture on camera, but trust me, it's amazeballs.


Apply with your fluffy shadow brush by patting it on to the inner 3/4th of your lid. You can kind of see the red shift of the Soul Dust in this photo.


Grab that tapered crease brush! Grab that Curiouser & Curiouser! Curiouser & Curiouser is a lovely plummy purple with aqua sparkles. Also, I love this brush, it's so incredibly versatile and it's synthetic, too!
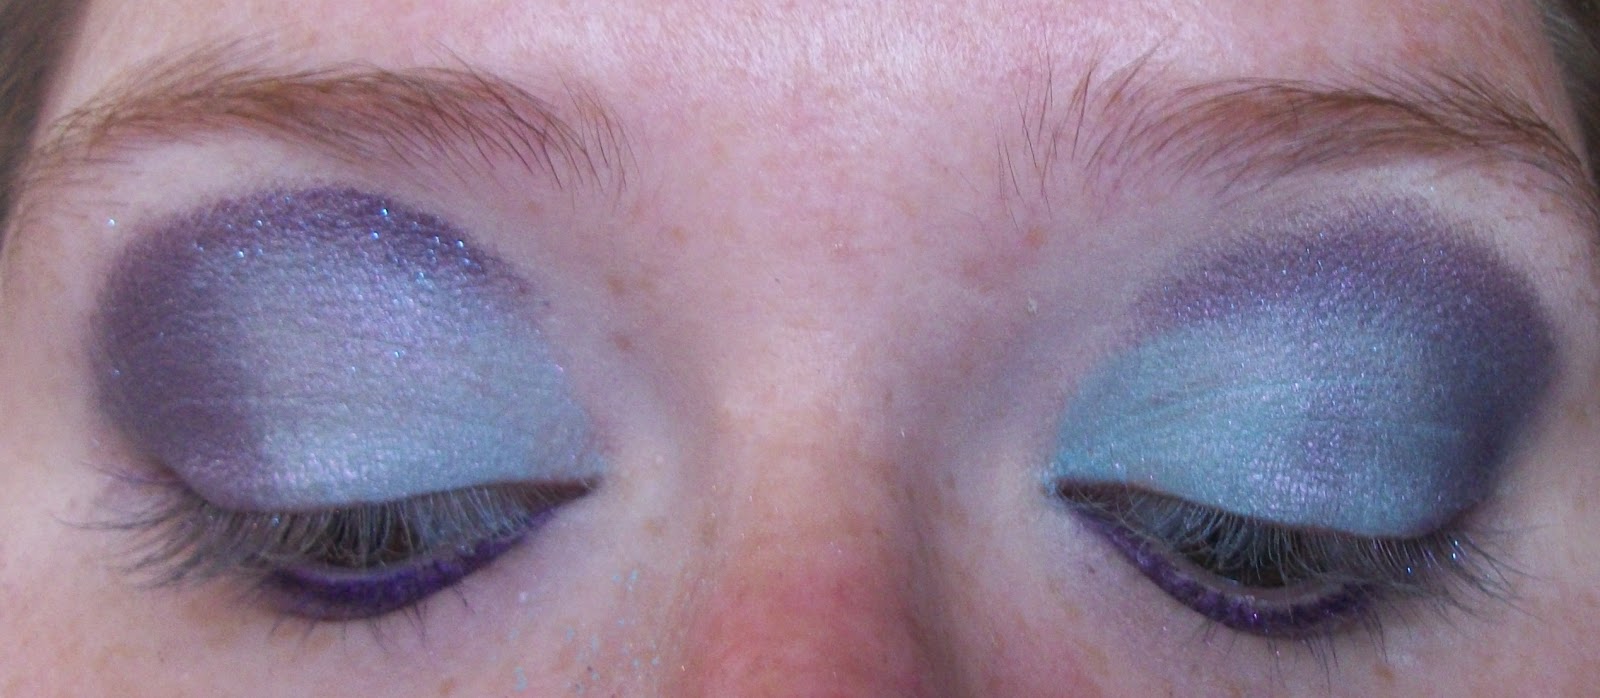

Pat C&C on the outer corner of your eye, and cut that crease with it. If you enlarge this photo, you can see the aqua sparks.


Use your fluffy blender to gently, gently blend C&C into Soul Dust.


With your tapered shadow brush, you want to apply Giggle Berry with a gentle sweeping motion from your tear duct to your brow as a highlight. Don't blend it down into C&C much at all.


You'll notice that after blending, the aqua in C&C really plays off the Soul Dust, and the pink in Giggle Berry brings out the red. 

You're also going to put a little bit of Perversion over the Psychadelic Sister at this point, just to tone it down a bit. 


Add your mascara...


Glance over at the dog...


And Voila! An awesome multi-dimensional look with some kick ass colors!

Friday, August 10, 2012

Soul Ravens

I have a little bit of an obsession with one of MSC's newer colors, Raven Feathers.  It's a dark, sultry, delightful color.  I can't get enough of it.  I also can't wear it quite as dark as I'd like to, because I don't do nights out to wear nighttime looks.  SO, I keep playing with it for day wear, and keep being tickled by the results.

Here's a look with Soul Dust, Pew Pew Pow, and of course, Raven Feathers.  Oh, Beauty School Dropout makes an appearance for highlight, too!


So, I picked up this E.L.F. brush set for $0.88, and decided that this look was going to feature these brushes.  Out of the package I was impressed - little shedding, tight ferrules, nice balance in the hand.  More thoughts on them after I use them.


Random Estee Lauder pallette for my brows, NYX white shadow base, MSC Soul Dust, Pew Pew Pow, Beauty School Dropout, Raven Feathers, Awesome Sauce, and Optimus Primer, Sephora Hot Hues liner pencil in sparkly black, and WnW MegaPLUMP mascara.

E.L.F. Studio Professional small smudge brush, crease brush, C shadow brush, Sephora crease brush, pencil brush, flat concealer brush, brow/lash tool.


BIG GLASS OF ICE WATER.  Seriously, this is one of the best kept beauty secrets- keep your skin hydrated by staying hydrated. 


Use that concealer brush with a dot of Awesome Sauce in the NYX primer to make it ALL TEH STICKY! 
Over your primer, that is.


Blend a bit with fingertips.


Pat on the Soul Dust to the inner corners, going up into the crease.


Now pat on your Pew Pew Pow, out to the barest part of your outer lid, taking it up to the crease and meeting it at where the Soul Dust left off.


Finish off the outer V's of your lid with Raven Feathers, and bring that up above the crease just a little.


Apply Beauty School Dropout above the Raven Feathers.  Blend everything gently with fingertips.


Do your brows, line your lower lash line, and add some mascara.

Voila!

I have to say, I'm impressed with the E.L.F. brushes.  They picked up pigment well, were supple to use, and seem to be well constructed.  Not a bad investment for $0.88 if I do say so myself.

Stay Madd, darlings!

Friday, August 3, 2012

Inspired by Treasure Planet

I LOVE the movie "Treasure Planet."  It's one of the most underrated Disney movies around.

It comes as no surprise, then, that I decided to do a look inspired by it whilst my daughter had it on TV.

Here's the still that served as my muse:

Are those colors not stunning? Absolutely lovely.

Now.  You know the drill.  Gather your products and equipment!


L to R: VERY large fluffy shadow brush, crease brush, medium fluffy shadow brush, medium dense shadow brush, medium pencil brush, concealer/shadow base brush.

WnW MegaPlump mascara, Sephora sparkly black liner, NYX shadow base in white, MSC Awesome Sauce, Optimus Primer, and Greased Lightening, Kablammy, Unbirthday Star, Bang Bang, Pool of Tears, Disco Biscuit, and T-Birds.


Ignore my ungroomed eyebrow.  Apply in this order: Optimus Primer, NYX Shadow base, and just the teensiest smudge of Awesome Sauce.  Allow the Awesome Sauce to dry until tacky, and then re-blend with the shadow base (using a clean finger) if needed.


Line your lower lash line.


Apply Greased Lightening to your duct with the medium fluffy brush.  Then, inner to outer, apply T-Birds, Pool of Tears, and Disco Biscuit using the firm shadow brush.  Don't worry about the fallout yet, or how even you get it.


Blend GENTLY with the XL fluffy brush.


Time to cut your crease, but double it!  Cut first with Kablammy using the crease brush, and then on top of that with Bang Bang using the pencil brush.


Apply Unbirthday Star above your crease using the firm shadow brush.  Blend down from Unbirthday Star to your blues using the XL fluffy brush.


Clean up your fallout, apply mascara.


Ta Daaa!!!!! A gorgeous, bold look inspired by one of the best Disney movies around.

Stay Madd, darlings!

Friday, July 20, 2012

Robotic Waffle Ravens

I bet ya'll thought I forgot to do makeup, didn't you

I didn't.  I simply ran into about five months collective worth of technical difficulties that prevented me from sharing my pretties with you.

I'm happy to say, though, that I'm back with a vengeance.

Assemble thine tools!
Here we have UDPP depotted, NYX Eyeshadow Primer in White, MSC Raven Feathers, Blueberry Waffle, Birf'day Suit (did NOT end up being used,) and Mr. Roboto.  Also pictured is Wet 'n Wild MegaPlump mascara, Rimmel London kohl eyeliner in black, and Sephora mascara primer.  Assorted brushes, as well.


Start out with your UDPP and your NYX.  Not too opaque, this is a day look.


Pat the Blueberry Waffle using a fluffy angled brush all along your eye lid.


Using a pointed/domed crease brush, apply the Raven Feathers to the outer corner and up into the crease of your eyes.


Going from the ducts to your brow, use Mr. Roboto.  Also use Mr. Roboto to blend out the Raven Feathers into the Blueberry Waffle.


Apply your eyeliner in a tight line under your lower lashes.


Now go ahead and use your mascara primer.  I'm finding that despite being initially goopy, I really really like Sephora's.  Once it's dry, use a lash comb for definition.


Then go ahead and apply your mascara.  The mascara I used today was NOT waterproof, but I've noticed that with the mascara primer, it tends to be more water resistent.


Et voila! You have a lovely daytime look with a little bit of sultry on those beautiful peepers of yours.  Looks great with and without glasses!

Until next time, stay Madd, darlings!